Wednesday, August 29, 2012

Robots and Spaceship Brushcase.

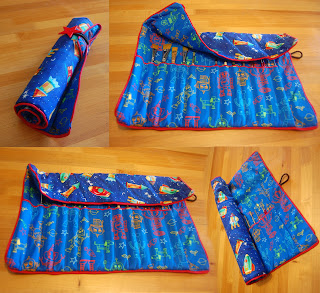
For the past few months I've been dealing with a brush case that's been driving me nuts. It's one that doesn't have a top flap, so I'm always spilling my brushes time I use it! So after successfully making a brush case for my oil brushes (see it here) I decided my watercolor brushes needed a brush case with personality and anti-spilling properties. Since watercolor pigments are washable I opted for prettier fabric. But since the pretty cottons were not as heavy duty as I wanted, I used a sturdy linen on the inside to strengthen the whole thing. 

Here's what I used: fabric, piping trim, thread, a button, a hair tie, and another bamboo placemat. 


Last time I made a case I made a casing for the bamboo placemat, this time I decided to glue the bamboo onto a piece of linen instead. Interestingly this may be why this brush holder is not as flexible. This one doesn't roll up as easily as the other one, but it still works! I left a little bit of linen on the sides so I could sew this part of the fabric, thereby keeping the bamboo placemat in place. 


Here's the different pieces I used:


.5'' Seam Allowance. 
I winged it on the length of the pocket flap. Since I didn't know how much fabric I'd need for the give, I guess-imated on the side of excess and cut off the what I didn't use at the end.

And some instructions that might demystify the process or just confuse you more.....

Just a little note about making your own brush case: don't make pockets all the way to both edges. Keep about a 1''-2'' flap on the side next to the tie/hairtie, to protect the brushes. Otherwise at least one brush will be exposed. I tried to give a pretty thorough explanation. But I probably failed. Don't worry I winged my way through this one and the other one and they both turned out pretty nifty. 

Total cost around $10, a day's work and a brush case that nobody else has :) 
And here it is all finished and stuff. With awesome robots and spaceships to protect my brushes.


Refashion: Men's Shirt to Shirtdress

Found this XXL Old Navy shirt at the thrift store for $3. I thought the bright coral of the shirt was a little weird for a guy's shirt. And I'm guessing so did the guy who received this as the original Old Navy tags were still attached! Never before wore! Anyways I had been on the lookout for men's shirt that could be easily transformed into a dress. And this was the first I found that had a nice color, was in good condition and was long enough!


I started by removing the sleeves. Then I pinched in the sides for the bodice, but let the skirt flare out beginning at the waist. I wasn't happy with how the dress was fitting so I tried to make a belt out of the remants gleaned from taking the sides in. But there simply wasn't enough fabric for that! I was about to figure out how to harvest a belt from the sleeves, until I remembered I had a bit of fabric left over from shortening the skirt on this refashion.

See this refashion  Here


The two corals matched almost perfectly and now I got to add a little floral punch to this dress. Coming from two lines of packrats has taught me to save your big scraps! They can be useful when you least expect it.

Alas even after trying on the dress with the belt I wasn't happy with the way the dress fit. I examined a shirtdress I already had, and noticed the use of banana darts. So I added two the the front, starting under the bosoms and ending a little below the waist, and two to the back. Then two horizontal darts, on the side of the bosom. Finally it fit the way I wanted it to!

Then it was pocket time. Any shirtdress I own should have pockets. I removed a pocket from the shirt. But this breast pocket wasn't big enough for comfy hand resting. So, using the removed pocket as a template I cut two new ones out that were about 1" wider and 1" taller from one of the removed sleeves. And I still had some of the coral floral fabric. So I trimmed the top 1" of the pockets with it. For figuring out placement I again refered to the Shirtdress I already had.
And finally I finished  off the armholes. For some reason I kept thinking the armholes were going to be terrifyingly difficult. Instead they were actually pretty easy once I figured em out.
Lastly I changed out the boring white buttons for some coral shank buttons. 


Pockets get button love, too!


Wednesday, August 15, 2012

Refashion: loose shirt to fitted Caribbean tank

Got this shirt at the thrift store for $1.50. For such a great deal I couldn't pass up the funky print and the cotton/rayon mixture


Off come the sleeves!

Changed the buttons to awesome pink flowers!
Took me forever to figure out how to size the top. Each time I tried to tailor it I didn't like how it looked. Finally I got out a shirt I already had that fit me well to use as a pattern and that actually seemed to work.
Ta Da a tank top!


Monday, August 13, 2012

Kid Robot My Way

I know a certain someone who likes Kid Robot stuff, so I decorated one of the blank DIY ones for him. This also explains my lack of posts recently, because I've been working on this but didn't want to spoil the surprise with the in progress pics!

Anyways here's what the little guy looked like before I painted him.

From my art school training I've learned the importance of thumbnails. So here's a bunch that I did to test out ideas and colors, even if I didn't exactly follow my thumbs, but whatevs. My second favorite was the turquoise and gold guy. Almost went with him.... But couldn't find turquoise pom poms. Keep reading the importance of pom poms will be revealed.


In the comp sketches you see the hat that the little guy came with. This little bowler hat just was no where near as cool as a mariachi hat. So I decide to make one. How do to that???? First I needed a hat block (ie head dress form) that I could pin into. So I put plastic over the little guy. And then wrapped duct tape tightly over the plastic. Then I carefully cut it off, removed it from the Munny, and then sealed up the cut I made on the plastic and duct tape thingy. Next I stuffed the plastic duct tape thing, sealed up the bottom and voila! I had a hat block, Munny style!


Next I played around with felt, winging it as I went to make a sombrero. It ain't perfect but I'm no milliner. Anyways how I did it, so that the felt kept its shape was to soak the felt in a mixture of 50% water and 50% water. While the gluey mixture is drying the felt needs to be pinned, or kept in the shape you want it to dry in. (This is a little trick I picked up from Tara Maginnis who is an awesome costume designer and teacher at Diablo Valley College.)


After it was dry I removed the pins and jazzed up the hat. Add some red trim and dangly pom poms (added with hand stitching, ahhhhh the torture whyyyyy did it decided to do this again?) and it looked awesome!


And now onto the actual doll....


Added some varnish that was a little finicky but I fixed it.

And here's the whole shebang. And if he doesn't like it, I'm taking it back.